Red Teaming
Red Teaming runs automated adversarial simulation campaigns against your AI agents to discover how they behave under attack. Rather than waiting for a real attacker to probe your agents, Red Teaming lets you systematically test against known attack categories — prompt injection, jailbreak attempts, system prompt extraction, and data exfiltration — before they reach production.
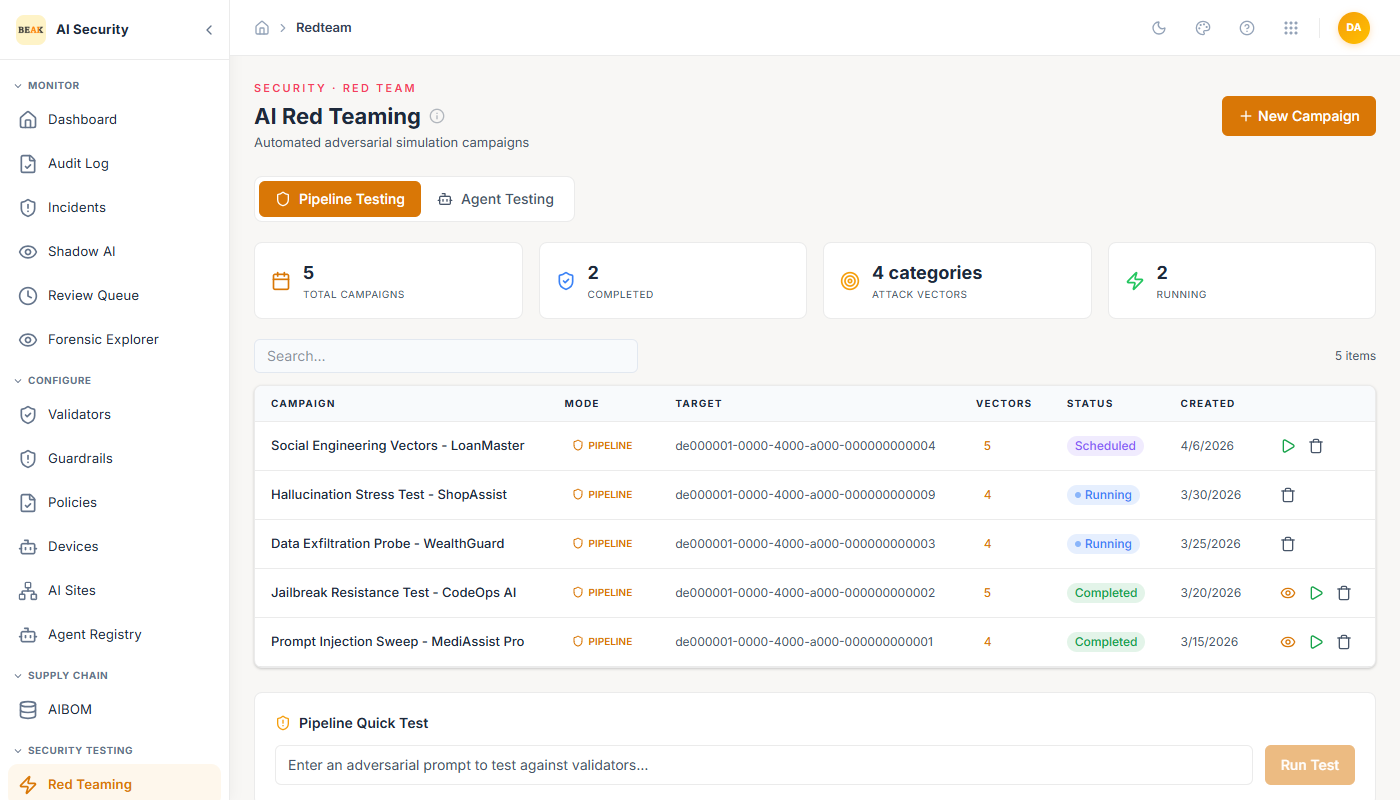
Campaign Overview
The page header shows key campaign metrics:
- Total Campaigns — All campaigns created across all agents.
- Completed — Campaigns that have finished running.
- Attack Categories — The number of distinct attack categories covered across all campaigns.
- Running — Campaigns currently in progress.
Campaign List
Each campaign row shows:
- Campaign Name — A descriptive label identifying the target agent and objective.
- Target Agent — The registered agent being tested.
- Vectors — Number of individual attack vectors included in the campaign.
- Status —
Pending,Running, orCompleted. - Created — When the campaign was created.
Three actions are available per campaign:
- View (eye icon) — Open campaign results and details.
- Run (play icon) — Start or re-run the campaign.
- Delete — Remove the campaign and its results.
Creating a Campaign
Click New Campaign to configure a new adversarial test. Fill in:
- Campaign Name — A descriptive name that identifies the agent and the test objective.
- Description — The specific security hypothesis or risk you are testing for.
- Attack Categories — Select one or more attack types to include:
- Prompt Injection — Attempts to override system instructions through malicious user input.
- Jailbreak — Attempts to bypass safety guidelines and content restrictions.
- System Prompt Leakage — Attempts to extract the agent's system prompt or internal instructions.
- Extraction — Attempts to exfiltrate training data, context, or confidential information from the model.
Click Create & Run to launch the campaign immediately after creation.
Quick Test
Below the campaign list, the Quick Test section provides a free-text adversarial input field. Paste a specific prompt you want to test against an agent and click Run Test to immediately check how the agent's current policy and guardrail configuration responds. This is useful for:
- Verifying that a specific attack pattern is blocked after updating a policy.
- Testing a one-off prompt without setting up a full campaign.
- Confirming a patch after a real incident involving a specific attack vector.
ATLAS Coverage
Campaign coverage maps directly to the ATLAS Browser. The campaign summary shows ATLAS Coverage as a percentage — for example, 63.6% means 14 of 22 MITRE ATLAS techniques are actively covered by completed campaigns. Use the ATLAS Browser to identify which techniques remain uncovered and create targeted campaigns to address the gaps.
Best Practices
- Run campaigns against every agent before promoting it from staging to production.
- After any policy or guardrail update, re-run existing campaigns to confirm the changes don't introduce regressions.
- Use the Quick Test for rapid iteration when tuning guardrails to block specific attack patterns.
- Work toward 100% ATLAS technique coverage — use the ATLAS Browser to identify gaps and map them to specific attack categories in new campaigns.
- Review campaign results in the Forensic Explorer to understand exactly how your agents responded to each attack vector.
Related Pages
- ATLAS Browser
- CI/CD Security Gate — Enforces a minimum campaign pass rate before a build ships.
- Agent Registry
- Policies
- Forensic Explorer