Service Desk & ITOps Agent – Setup Guide
Overview
This guide walks you through configuring all required components for the Service Desk & ITOps Agent in your environment. Follow the steps carefully, and provide the requested details back to our implementation team.
1. Pre-Requisites: Network & System Requirements
1.1 SaaS Platform Requirements
Network
- Outbound HTTPS (TCP 443) allowed to:
*.beakops.com(exact domain provided during onboarding)
- DNS resolution enabled for the above domains
- No inbound traffic required
1.2 On-Prem AI Gateway Requirements
System Requirements
| Requirement | Value |
|---|---|
| OS | Windows Server 2019 or later (domain-joined) |
| CPU | 4 cores minimum |
| RAM | 16 GB minimum |
| Storage | 20 GB free space |
| Network | 1 Gbps NIC |
Required Components
| Component | Requirement |
|---|---|
| .NET Framework | Version 4.6 or later |
| PowerShell | Version 5.0 or later |
msiexec Utility | Must be included in PATH |
| TLS Protocol | TLS 1.2 or higher |
| Visual C++ Redistributable | Microsoft Visual C++ 2013 or later |
| WinRM (Windows Remote Management) | Must be enabled |
| RSAT (Remote Server Admin Tools) | Must be installed and enabled |
Environment Variable Configuration
- Ensure the PowerShell executable path is added to the system's
PATHenvironment variable. - This is required for the Beak On-Prem AI Gateway to reliably invoke PowerShell commands during runtime.
PowerShell Execution Policy
- The PowerShell Execution Policy must be set to RemoteSigned.
- This policy acts as a safeguard against the execution of potentially harmful scripts.
RemoteSignedrequires that downloaded scripts are digitally signed.- This setting can be applied directly on the endpoint or managed centrally via Group Policy.
Agent Process Exclusions
To avoid detection of false positives by antivirus applications:
- It is advisable to add exclusions for the agent executables.
- Recommended executable names to exclude:
beakservicemanager.exebeakgateway.exe
Uptime
- The Beak On-Prem AI Gateway should maintain 99.9% uptime.
- This ensures consistent availability for AI workloads and integrations.
- Routine maintenance windows should be:
- Scheduled during low-usage periods
- Communicated in advance
Impact of Unavailability
If the Beak On-Prem AI Gateway is unavailable, it may result in:
- Service disruption: AI-driven applications and dependent workflows may fail or perform poorly.
- Business impact: Delays in automation, reporting, and decision-making processes.
- Operational risk: Increased manual effort or fallback procedures may be required until the gateway is restored.
Network Requirements
- Outbound HTTPS (TCP 443) to SaaS platform
- Connectivity to Domain Controllers:
- TCP/UDP 389 (LDAP) or 636 (LDAPS)
- TCP/UDP 88 (Kerberos)
- TCP/UDP 53 (DNS)
- TCP 445 (SMB) – if required for replication queries
Network Whitelisting Requirements
Include all subdomains of beakops.com in the whitelist to ensure full connectivity with the Beak platform:
| Domain | Port | Protocol |
|---|---|---|
app.beakops.com | 443 | TCP / HTTPS |
beakstream-bootstrap.beakops.com | 9094 | TCP |
beakstream-bk0.beakops.com | 9094 | TCP |
beakstream-bk1.beakops.com | 9094 | TCP |
beakstream-bk2.beakops.com | 9094 | TCP |
Service Account Setup
1. Create the Service Account
- Log in to a domain-joined system with RSAT or Active Directory Users and Computers (ADUC).
- Navigate to the desired Organizational Unit (OU) where you want to create the account.
- Right-click → New > User
- Fill in:
- Full name:
Beak Agent Service Account - User login name:
beaksvc
- Full name:
- Set a secure password and check:
- Password never expires
- User cannot change password
- (Optional) Account is disabled – leave unchecked
- Finish creation and note down the username (e.g.,
domain\beaksvc) and password securely.
2. Delegate Access to the Service Account
- In ADUC, right-click the target OU (where user/group operations will occur).
- Click "Delegate Control".
- Click "Next" and add user:
beaksvc - Choose: "Delegate the following common tasks"
- Check:
- Create, delete and manage user accounts
- Reset user passwords and force password change at next login
- Read all user information
- Create, delete and manage groups
- Modify the membership of a group
- Complete the wizard.
3. Add to Remote Management Group
- In ADUC, go to the
Builtinfolder. - Open group: Remote Management Users
- Right click and select "Add to Group"
- Add user
beaksvcto the group.
1.3 Pre-Deployment Checklist
- Firewall rules updated for SaaS + On-Prem Gateway
- Windows Server provisioned (meets requirements, domain-joined)
- DNS resolution configured for SaaS domain
- AD service account created with delegated rights
- Gateway server connectivity validated to DCs
2. Microsoft Entra ID (Azure AD) Setup for SSO
2.1 Register a New Application
- Sign in to the Azure Portal.
- Navigate to Microsoft Entra ID → App registrations.
- Click + New registration.
- Fill in:
- Name:
Service Desk Agent - Account type: Select your preferred option (usually "Accounts in this organizational directory only")
- Redirect URI: choose web and enter the redirect URI provided by our implementation team (e.g.,
https://client.servicedeskagent.com/auth/callback)
- Name:
- Click Register
2.2 Capture Application (Client) Info
After registration, note the following values:
- Application (client) ID
- Directory (tenant) ID
2.3 Configure Authentication
- Go to Authentication in the App Registration.
- Confirm the Redirect URI.
- Set Default client type to Yes (for mobile/desktop support).
- Under Implicit grant and hybrid flows, check:
- ID tokens
- Access tokens
- Click Save
2.4 Create a Client Secret
- Go to Certificates & secrets.
- Under Client Secrets, click + New client secret.
- Description:
Service Desk Agent Secret - Choose expiry: e.g., 12 months or longer if allowed
- Click Add
- Copy the secret value immediately.
Share with us:
- Application (client) ID
- Directory (tenant) ID
- Client Secret Value
2.5 Grant API Permissions
- In the App Registration, go to API Permissions.
- Click + Add a permission.
- Choose: Microsoft Graph → Delegated permissions
- Add:
User.ReadUser.ReadBasic.AllUser.ReadWrite(if needed)Directory.Read.AllDirectory.ReadWrite.All(if agent will manage user attributes)
- Click Add permissions
- Click Grant admin consent for [Your Organization]
Share with us:
- Confirmation that admin consent has been granted
3. Microsoft Teams Setup
3.1 Creating an Azure Bot
-
Go to: https://portal.azure.com
-
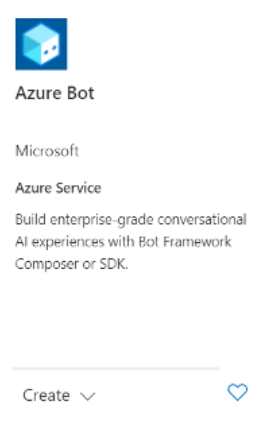
Search for and select "Azure Bot" from the Azure Marketplace.
-
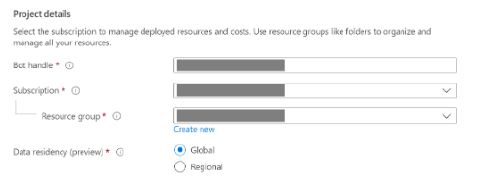
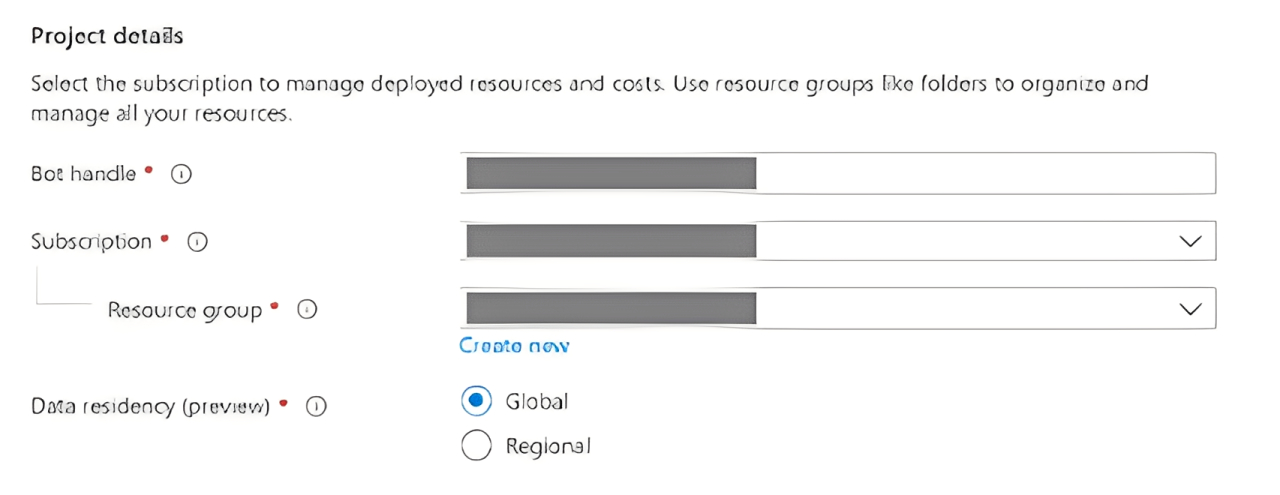
Click "Create" and fill in the basic details:
- Bot handle:
beakservicedeak - Subscription: Select your active Azure subscription
- Resource Group: Choose an existing group or create a new one
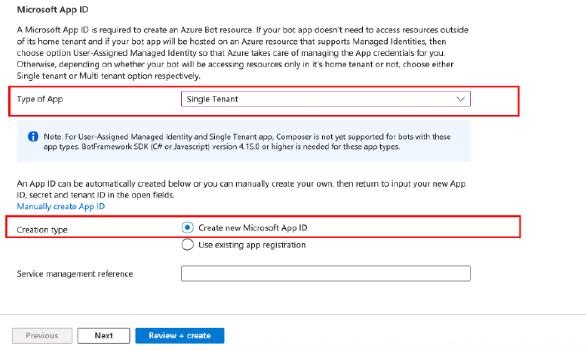
- Type of App: Single Tenant
- Microsoft App ID: Select "Create new Microsoft App ID"
- Bot handle:
-
Click "Review + Create", then click "Create".
-
After deployment:
- Navigate to the Bot resource
- Go to "Channels" under Settings
- Click "Microsoft Teams" → Save to enable the Teams channel
-
Go to the "Configuration" section and note:
- Microsoft App ID
- Messaging endpoint (can be left blank or use a placeholder like
https://client.beakops.com/api/messages; BeakOps implementation team will provide the final HTTPS endpoint)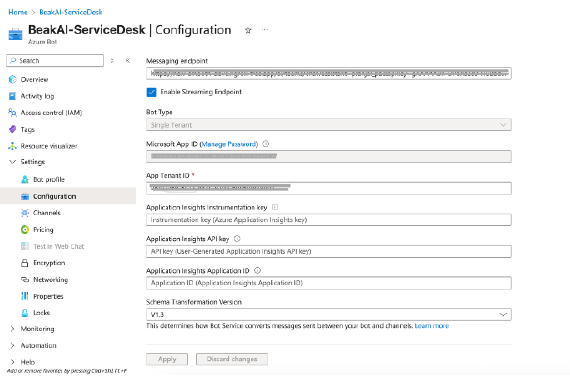
-
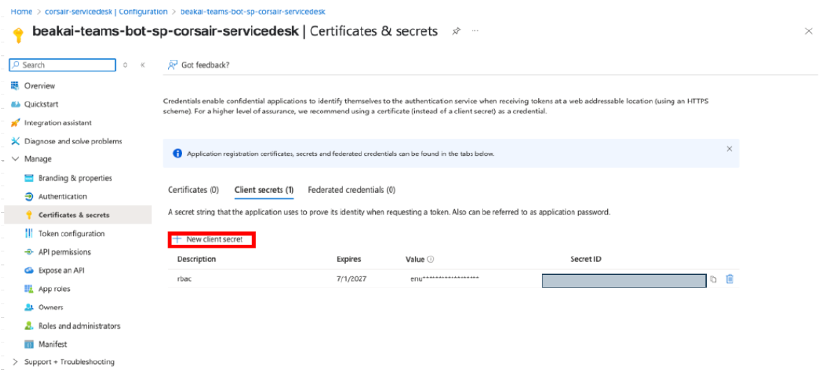
Click "Manage Password" to open the App Registration screen.
-
Click "New Client Secret":
- Set a description and expiry
- Click "Add"
- Copy the client secret (it won't be shown again)
-
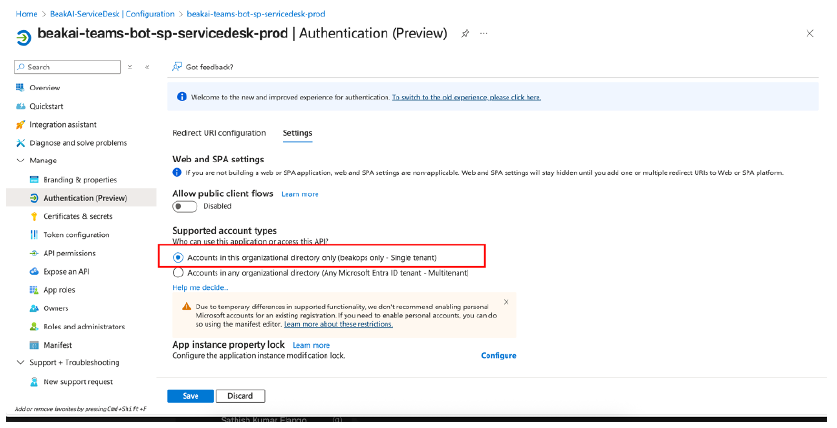
Navigate to the Authentication tab:
- Under Settings → Select account type: Single-tenant
- Under Settings → Select account type: Single-tenant
-
Navigate to API Permissions:
- Click "+ Add a permission"
- Under Microsoft APIs, choose Microsoft Graph
- Select Application Permission
- Search and add:
User.Read.All - Click Add Permission
- Click Grant admin consent for [Your Organization]
Share with us:
- Bot Handle
- Microsoft App ID
- Client Secret
- Azure Tenant ID
3.2 Enable Custom Apps (if not already enabled)
- Sign in to the Teams Admin Center.
- In the left navigation, go to Teams apps → Manage apps
- Ensure "Allow interaction with custom apps" is enabled
3.3 Upload the Service Desk Agent App
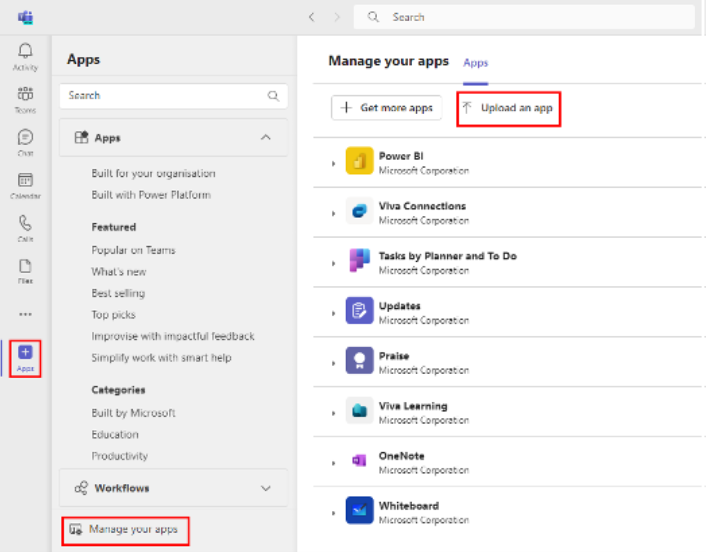
- In Teams Admin Center, go to Teams apps → Manage apps
- Click Upload new app
- Browse and select the
.zippackage provided by our implementation team - Confirm upload
3.4 Grant Admin Consent
- In Teams Admin Center, go to Teams apps → Permissions policies
- Locate the policy applied to your users
- Ensure the Service Desk Agent app is allowed
- When prompted, click Grant admin consent
3.5 Distribute the App to Users
- Go to Teams apps → Setup policies
- Select your organization’s policy (or create a new one)
- Add the Service Desk Agent app under Pinned apps
- Assign the policy to:
- All users (organization-wide), or
- Selected groups (e.g., IT, HR)
Share with us:
- Confirmation that the bot is visible in Teams
- Which groups/users have been assigned
4. On-Prem Active Directory Setup (via Beak On-Prem AI Gateway)
4.1 Prepare Environment
- Identify a Windows Server (domain-joined) where the Beak On-Prem AI Gateway will be installed.
- Ensure the server has outbound internet access over HTTPS (port 443).
- Allow firewall traffic to the Service Desk Agent SaaS endpoint (details provided during onboarding).
- Run the following script to verify connectivity from the Beak AI On-Prem Gateway to Active Directory:
<#----------------------------------------------------------------
 • Enables WinRM
 • Creates/ensures HTTP listener on port 5985
 • Enables Basic auth + unencrypted traffic (for cross-domain remoting)
 • Adds service account to “Remote Management Users”
 • Enables WinRM firewall rules
----------------------------------------------------------------#>

$AllowedUser = '<DOMAIN>\BEAKSVC'  # ← your service account

Write-Host "`n[1] Enabling PowerShell Remoting..." -ForegroundColor Cyan
Enable-PSRemoting -Force

Write-Host "`n[2] Configuring WinRM to start automatically..." -ForegroundColor Cyan
Set-Service WinRM -StartupType Automatic
Start-Service WinRM

Write-Host "`n[3] Setting WinRM authentication and listener (HTTP:5985)..." -ForegroundColor Cyan
Set-Item WSMan:\localhost\Service\AllowUnencrypted -Value $true
Set-Item WSMan:\localhost\Service\Auth\Basic -Value $true

# Ensure HTTP listener exists
if (-not (Get-ChildItem WSMan:\localhost\Listener | Where-Object { $_.Keys -match 'Transport=HTTP' })) {
    New-Item -Path WSMan:\localhost\Listener -Transport HTTP -Address * -Port 5985
    Write-Host "✓ HTTP listener created on port 5985" -ForegroundColor Green
} else {
    Write-Host "✓ HTTP listener already present" -ForegroundColor Green
}

Write-Host "`n[4] Adding $AllowedUser to 'Remote Management Users'..." -ForegroundColor Cyan
try {
    Add-LocalGroupMember -Group 'Remote Management Users' -Member $AllowedUser -ErrorAction Stop
    Write-Host "✓ User added to Remote Management Users group" -ForegroundColor Green
}
catch {
    Write-Warning "User may already be added or couldn't be added: $_"
}

Write-Host "`n[5] Enabling Windows Firewall rule for WinRM (HTTP-In)..." -ForegroundColor Cyan
Enable-NetFirewallRule -DisplayName 'Windows Remote Management (HTTP-In)'

Write-Host "`n[6] Local WinRM test:" -ForegroundColor Cyan
Test-WSMan localhost

Write-Host "`n✅ DONE: '$AllowedUser' can now use WinRM to connect to this domain controller." -ForegroundColor Green
4.2 Install the Beak On-Prem AI Gateway
- Download the Beak On-Prem AI Gateway installer package (steps will be provided during onboarding).
- Run the installer on the prepared Windows Server.
- Verify that the gateway successfully connects to:
- Active Directory
- SaaS platform
4.3 Validate Connection
- Perform a test password reset on a non-production account to confirm AD integration.
- Use the following script to perform the test:
<#--------------------------------------------------------------
Remote-PasswordReset.ps1
• Uses service account to connect to DC
• Resets a user’s password in Active Directory
• Must be run from a domain-joined machine with network access to DC
---------------------------------------------------------------#>

# --- Service Account Credentials ---
$svcUser = '<DOMAIN>\<SERVICE_ACCOUNT>'              # e.g. BEAKOPS\BEAKSVC
$svcPasswordPlain = '<SERVICE_ACCOUNT_PASSWORD>'     # e.g. NW8!E2pJc
$svcSecure = ConvertTo-SecureString $svcPasswordPlain -AsPlainText -Force
$svcCred = [PSCredential]::new($svcUser, $svcSecure)

# --- Domain Controller ---
$dc = '<DOMAIN_CONTROLLER_FQDN>'                    # e.g. dc.beakops.com

# --- Target User ---
$SamAccountName = '<TARGET_SAMACCOUNTNAME>'          # e.g. testuser
$NewPassword = '<NEW_PASSWORD>'                      # e.g. P@ssword123!

# --- Open Remote Session ---
$session = New-PSSession -ComputerName $dc -Credential $svcCred

# --- Run Password Reset Remotely ---
Invoke-Command -Session $session -ArgumentList $SamAccountName, $NewPassword -ScriptBlock {
    param($sam, $pwd)
    Import-Module ActiveDirectory
    try {
        # Reset password
        Set-ADAccountPassword -Identity $sam -Reset `
            -NewPassword (ConvertTo-SecureString $pwd -AsPlainText -Force) -ErrorAction Stop
        # (Optional) Force change at next logon
        Set-ADUser -Identity $sam -ChangePasswordAtLogon $true
        "Password reset successful for $sam"
    }
    catch {
        "Failed to reset password for $sam: $_"
    }
}

# --- Cleanup ---
Remove-PSSession $session
Share with us:
- Confirmation that the gateway is installed and connected
- Fully qualified domain names for Active Directory and Exchange Server
- Service account credentials (username & password)
- Validation logs (if required)
5. Knowledge & SOP Preparation
5.1 Collect Documentation
Gather all relevant Standard Operating Procedures (SOPs), policies, and process documents. Examples include:
- IT: password reset process, VPN troubleshooting, software installation guidelines
- HR: leave policies, payroll FAQs, onboarding steps
- Finance: reimbursement process, expense approval workflows
5.2 Format Documents
Accepted file types:
.docx(Word).pdf.txt(plain text)
Make sure documents are:
- Clear and up-to-date
- Free from unnecessary sensitive or confidential data
5.3 Organize Content
- Group documents by function (e.g., IT, HR, Finance)
- Use clear filenames
Example:IT_PasswordReset_SOP.pdf - Provide escalation workflows separately
Example:Escalation_Rules.docx
Share with us:
- The finalized document set for ingestion
6. Testing & Validation (UAT)
6.1 Prepare Test Accounts
Create test accounts in:
- Microsoft Entra ID (Azure AD)
- Jira Service Manager (JSM)
- On-Prem Active Directory (non-production)
6.2 Define Test Scenarios
Typical scenarios for User Acceptance Testing (UAT) include:
- Resetting a user password via Active Directory
- Creating a ticket in Jira Service Manager
- Querying an HR policy from uploaded SOPs
6.3 Run Tests
- Use Microsoft Teams to interact with the Service Desk Agent.
- Execute each test scenario step-by-step.
- Verify:
- Correct responses
- Triggered actions
- Proper escalations
Share with us:
- Test results
- Any issues or unexpected behaviors
7. Final Checklist
Before handing over to the Beak implementation team, confirm the following:
- Azure AD SSO is configured and tested
- Service account in Entra ID is created with correct permissions
- Teams bot is installed, admin consent granted, and distributed
- Jira Service Manager service account is created with API token
- On-prem AD service account is created with delegated rights
- Beak On-Prem AI Gateway is installed and connected
- SOPs and documents are collected and shared
- Test accounts are prepared
- UAT test scenarios have been executed