Ticket Management
Tickets are the core unit of work in BEAK ITSM. Each ticket tracks an issue or request from the moment it is created through to final resolution, maintaining a complete audit trail of every action, assignment, status change, and communication along the way.
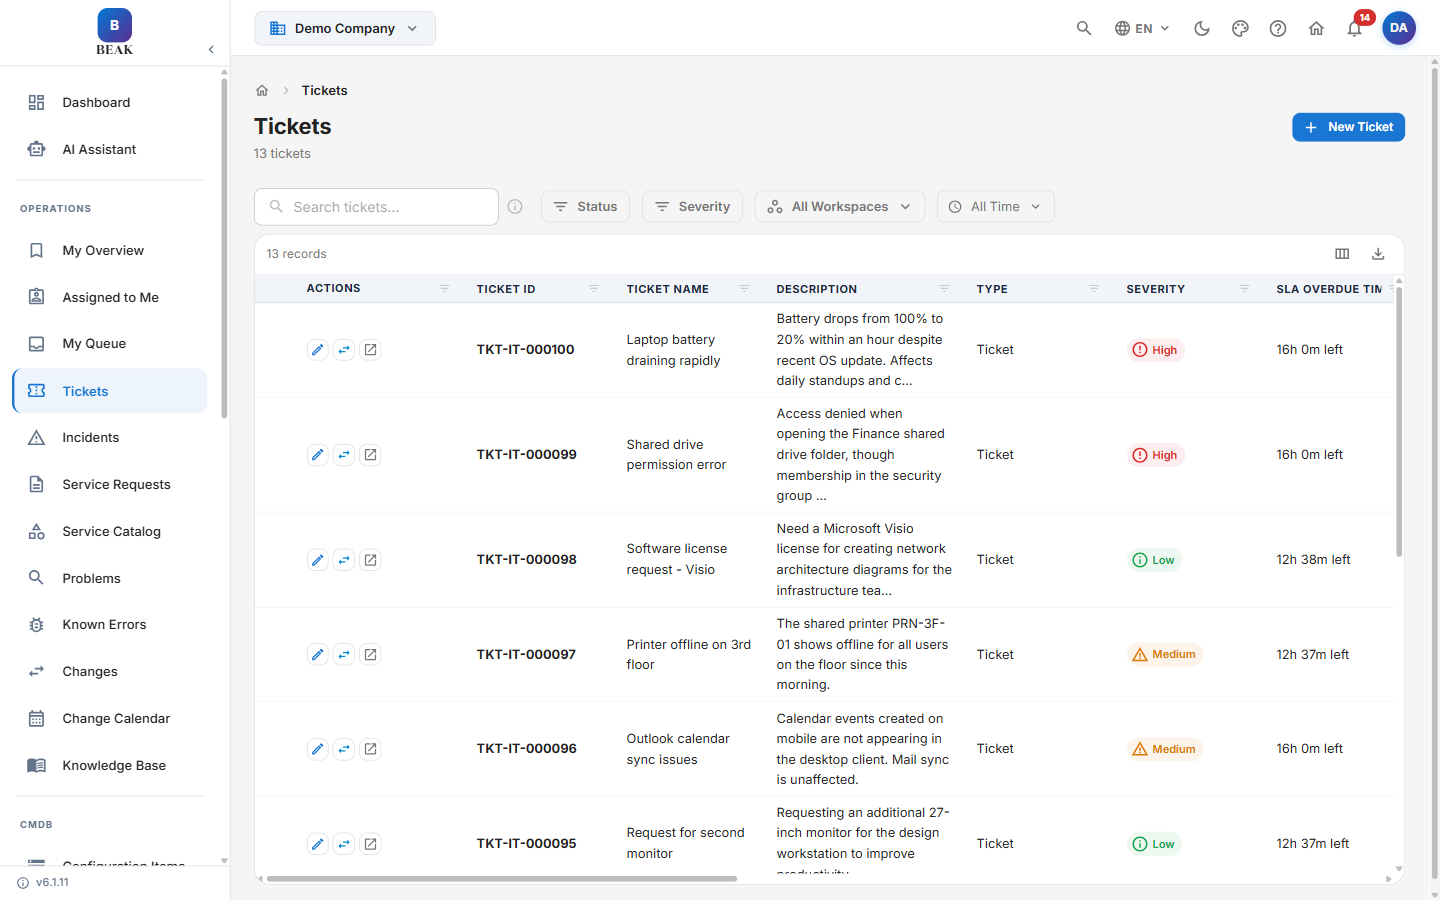
Ticket List View
The Ticket List provides a centralized view of all tickets across your workspace. The header shows the page title and a count of total tickets, with a New Ticket button in the top-right corner. Each row represents one ticket and displays the following columns:
| Column | Description |
|---|---|
| Actions | Per-row icons: Edit ticket, Transfer ticket, and Open in new tab |
| Ticket ID | Unique ticket identifier, e.g. TKT-IT-000100 |
| Ticket Name | Short summary of the issue or request |
| Description | Full detail of the issue or request |
| Type | Ticket type (task, ticket, incident, change, problem, service_request) |
| Severity | Impact level assigned to the ticket |
| SLA Overdue Time | How long the ticket is past its SLA target |
| Response SLA Breached | Flag indicating the response SLA has been breached |
| Resolution SLA Breached | Flag indicating the resolution SLA has been breached |
| Source | Channel the ticket originated from |
| Sub-Source | More specific origin within the source channel |
| Category | Functional classification of the issue |
| Sub-Category | More specific classification within the category |
| Ticket Status | Current lifecycle stage |
| Assigned User | Agent or team member responsible for resolution |
| Occurred On | Date and time the issue was reported |
| Target Date | The SLA target date for resolution |
Note: Severity and Priority are separate fields. Severity surfaces in the list columns and filters, while Priority is captured and shown on the ticket detail view.
Search and Filters
Use the search bar to locate tickets by keyword. The following filters are available above the list:
- Status — Filter by lifecycle stage
- Severity — Filter by Critical, High, Medium, Low (or Unknown when unset)
- All Workspaces — Filter to a specific workspace or view tickets across all workspaces
- All Time — Filter by a date range
List Controls
- Column Chooser — Toggle columns on or off to tailor the list view to your workflow
- Export — Export the current list for reporting or offline review
Creating a New Ticket
1. Open the New Ticket Form
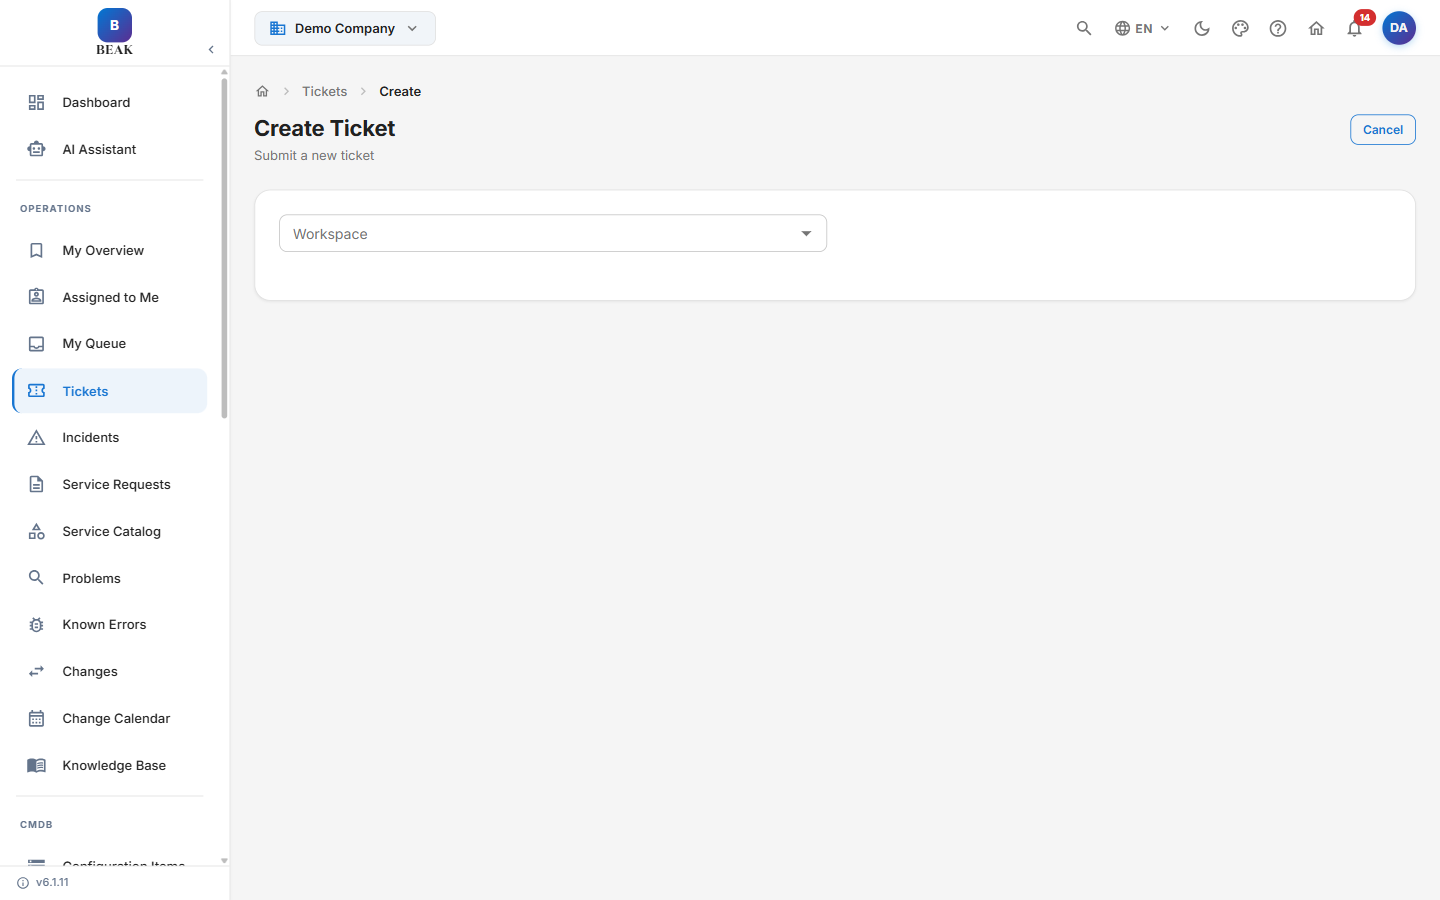
Click the New Ticket button in the top-right corner of the Ticket List. The form initially displays only the Workspace dropdown.
2. Select a Workspace
Choose the workspace under which the ticket will be managed. Once a workspace is selected, the form expands to reveal all remaining fields.
3. Fill In Ticket Details
The expanded form contains the following fields:
- Title* — A concise, descriptive summary of the issue or request
- Description* — Full details of the problem, steps to reproduce, or request specifics
- Category* — The functional area or service affected. Available categories include: HCM - Benefits, General Inquiry, HCM - Compensation, HCM - Payroll, Network, Software, IT Support, Hardware, Facilities, Access Management, HR Services, Email, Travel, Database, and Other
- Priority — The urgency for resolution:
Critical,High,Medium, orLow - Assign To — Search for the agent or team responsible for handling the ticket
4. Submit the Ticket
Click Create to submit the ticket. It is assigned a unique ticket identifier (e.g. TKT-IT-000100) and immediately appears in the Ticket List with a status of Open.
Note: If your workspace has automation rules configured, the ticket may be automatically assigned to an agent or queue based on category and priority immediately upon creation.
Ticket Lifecycle
Each ticket moves through a defined sequence of statuses from creation to closure. The Ticket Lifecycle stepper at the top of the ticket detail view indicates the current stage.
Open → In Progress → Pending → Resolved → Closed
Open— Ticket has been created and is awaiting assignment or initial actionIn Progress— An agent has taken ownership and is actively working on the issuePending— Awaiting a response from the requester, a third party, or a dependent taskResolved— The issue has been addressed; the resolution is awaiting requester confirmationClosed— The ticket is fully complete and no further action is required
Depending on your workspace configuration, additional statuses such as Paused, On Hold, Escalated, Overdue, and Cancelled may also apply outside the core lifecycle sequence.
Note: SLA timers pause automatically when a ticket enters Pending status and resume when it returns to In Progress. Confirm this behavior with your administrator, as it depends on your workspace SLA configuration.
Ticket Detail View
Click any ticket ID in the list to open the full Ticket Detail page. The header shows the ticket ID and title, with Back and Actions buttons. A Ticket Lifecycle stepper at the top tracks progress through Open → In Progress → Pending → Resolved → Closed.
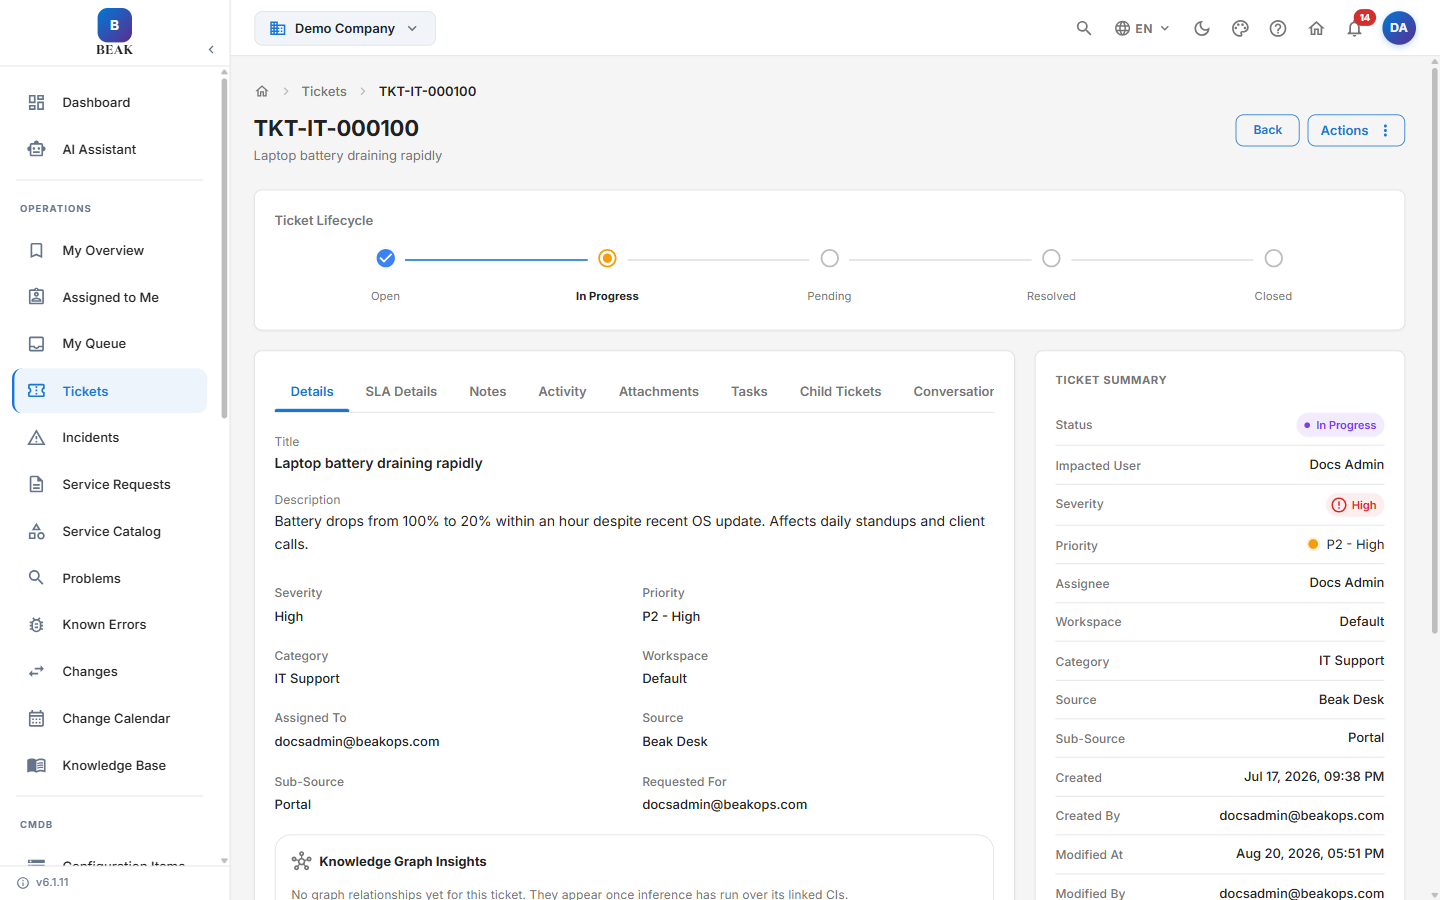
Ticket Summary Panel
The Ticket Summary panel displays all key metadata for the ticket at a glance:
- Status — Current lifecycle stage
- Impacted User — The user affected by the issue
- Severity — Impact level assigned to the ticket
- Priority — Assigned priority level
- Assignee — The agent currently responsible
- Workspace — The team context for this ticket
- Category — Functional classification of the issue
- Source — Channel the ticket originated from
- Sub-Source — More specific origin within the source channel
- Created — Date and time of ticket creation
- Created By — The user who created the ticket
- Modified At — Date and time of the most recent modification
- Modified By — The user who last modified the ticket
A separate Requester Information panel surfaces the requester's contact details.
SLA Status Section
The SLA Status section shows real-time compliance metrics, tracked separately for response and resolution:
- Response SLA — Percentage of the response time target consumed, with the due date and time
- Resolution SLA — Percentage of the resolution time target consumed, with the due date and time and a Breached flag when the target is missed
Color-coded indicators signal urgency: green for on track, yellow for approaching breach, and red for breached.
Tabs in Ticket Detail
The main body of the Ticket Detail page is organized into tabs. Each tab surfaces a different dimension of the ticket's lifecycle.
Details
Displays the ticket's core fields as captured at creation. The Details tab includes:
- Description — Full detail of the issue or request
- Title — Short summary of the issue or request
- Priority — Assigned priority level (e.g.
critical) - Category — Functional classification of the issue
- Workspace — The team context for this ticket
- Assigned To — The agent or team responsible
- Source — Channel the ticket originated from
- Sub-Source — More specific origin within the source channel
- Requested For — The user the ticket was raised on behalf of
Use this tab to review the requester's original context and the structured data captured at intake.
Below the ticket fields, a Knowledge Graph Insights panel surfaces graph relationships for the ticket — once inference has run over its linked Configuration Items, related CIs and impact paths appear here.
SLA Details
Displays real-time SLA compliance data for the ticket:
- Response SLA — Target response time, elapsed time, and compliance percentage
- Resolution SLA — Target resolution time, elapsed time, and compliance percentage
Color-coded progress bars indicate urgency: green for on track, yellow for approaching breach, and red for breached.
Notes
The Notes tab allows agents to record observations, updates, or communications related to the ticket.
- Add a new note using the text editor at the top of the tab
- Mark a note as Private / Internal to restrict visibility to agents only — requesters will not see internal notes
- Existing notes display the author name, timestamp, and full note content in chronological order
Note: Internal notes are a best practice for documenting troubleshooting steps, escalation decisions, and vendor communications that should not be visible to the end user.
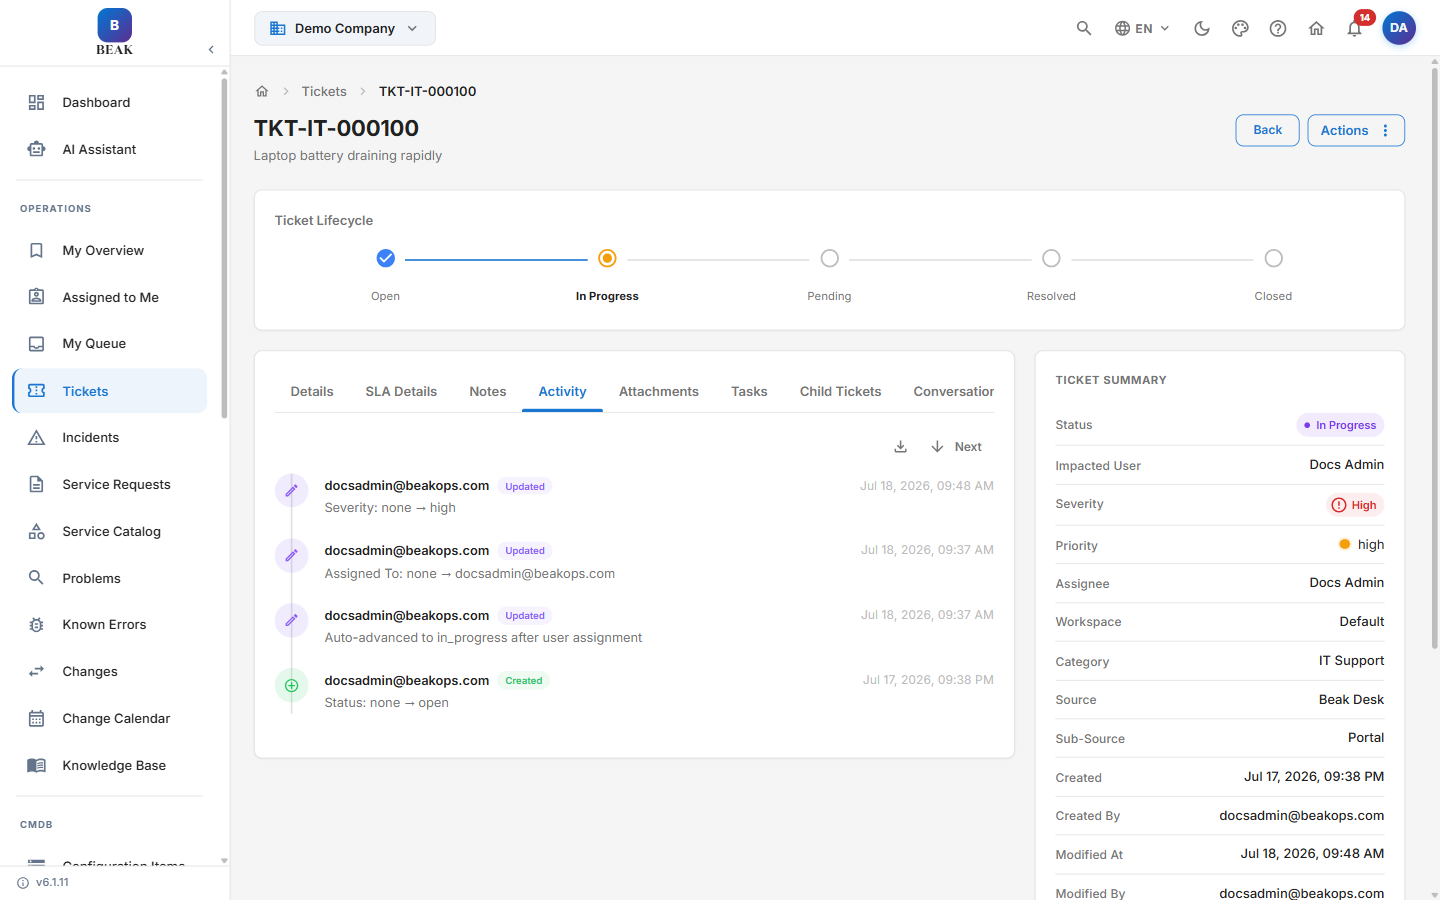
Activity
The Activity tab provides a complete, immutable audit trail of everything that has happened on the ticket:
- All status transitions with the acting agent and timestamp
- Assignment changes and reassignments
- Field edits (severity, priority, category, etc.)
- Comments added by agents or requesters
- Linked item additions or removals
Use the export and navigation controls at the top of the tab to download the audit trail or step through longer histories.
Attachments
Upload and manage files related to the ticket — screenshots, log files, configuration exports, or any supporting documentation. A maximum of 10 files can be attached per ticket. Attached files are listed with filename, size, uploader, and upload timestamp.
Tasks
Break the ticket into discrete sub-tasks when resolution requires multiple steps or involves more than one person. Each task can be assigned independently, marked complete, and tracked within the parent ticket context.
- Add Task — Enter a task name and optional assignee
- Task Status — Mark tasks as pending, in progress, or complete
- Completing all tasks does not automatically resolve the parent ticket
Child Tickets
For complex issues that need to be split across multiple workstreams, create child tickets directly linked to the parent.
- Click + Child Ticket to open the new ticket form with the parent reference pre-populated
- All child tickets are listed here with their ID, title, status, and assignee
- Resolving child tickets does not automatically resolve the parent ticket
Note: Child tickets are independent tickets with their own lifecycle, SLA, and audit trail. Use them when a sub-issue requires a different assignee, category, or workspace from the parent.
Conversations
Email conversations associated with the ticket are collected here, with Content, Sender, From, and To columns and a search bar to locate a specific message. When a ticket is created from or linked to an email thread, the exchange appears in this tab so agents can review the full communication history without leaving the ticket.
Assets
Lists the assets linked to the ticket. Linking the affected hardware or software to a ticket gives agents immediate context about the impacted equipment and builds a service history for each asset.
Actions Menu
The Actions button on the ticket detail toolbar provides quick access to common ticket operations such as editing the ticket and transferring it to a different agent or queue.
From the Ticket List, each row also exposes quick actions as icons:
- Edit ticket — Modify the ticket's standard fields
- Transfer ticket — Reassign the ticket to a different agent or queue
- Open in new tab — Open the ticket detail view in a new browser tab
Best Practices
- Write descriptive titles — A title like "Email not working for marketing team since 9am" is far more actionable than "Email issue."
- Set severity and priority accurately at creation — Incorrect classifications affect SLA timers and routing rules from the start.
- Use internal notes for agent-only context — Keep requester-facing communication clear and professional by routing internal discussion to the Notes tab.
- Review the Activity tab before reassigning — Understand what has already been attempted before transferring ownership to avoid duplicate effort.
- Create tasks for multi-step resolutions — Breaking complex fixes into tasks improves visibility and accountability across the team.
- Confirm resolution with the requester before closing — Move to Resolved first and allow the requester to confirm before marking the ticket Closed.
Related Pages
- Incident Management — For unplanned service interruptions requiring ITIL-aligned incident workflows
- Service Requests and Catalog — For standard fulfillment requests via the self-service catalog
- SLA Settings — Configure response and resolution targets per priority and category
- Workflows — Automate ticket assignment, escalation, and notification rules