Form Builder
The Form Builder lets administrators design custom forms for different ticket types, workspaces, categories, and actions. Forms control exactly which fields users see when creating, editing, or viewing tickets and incidents, allowing your organization to capture the right information at every stage of the ITSM lifecycle.
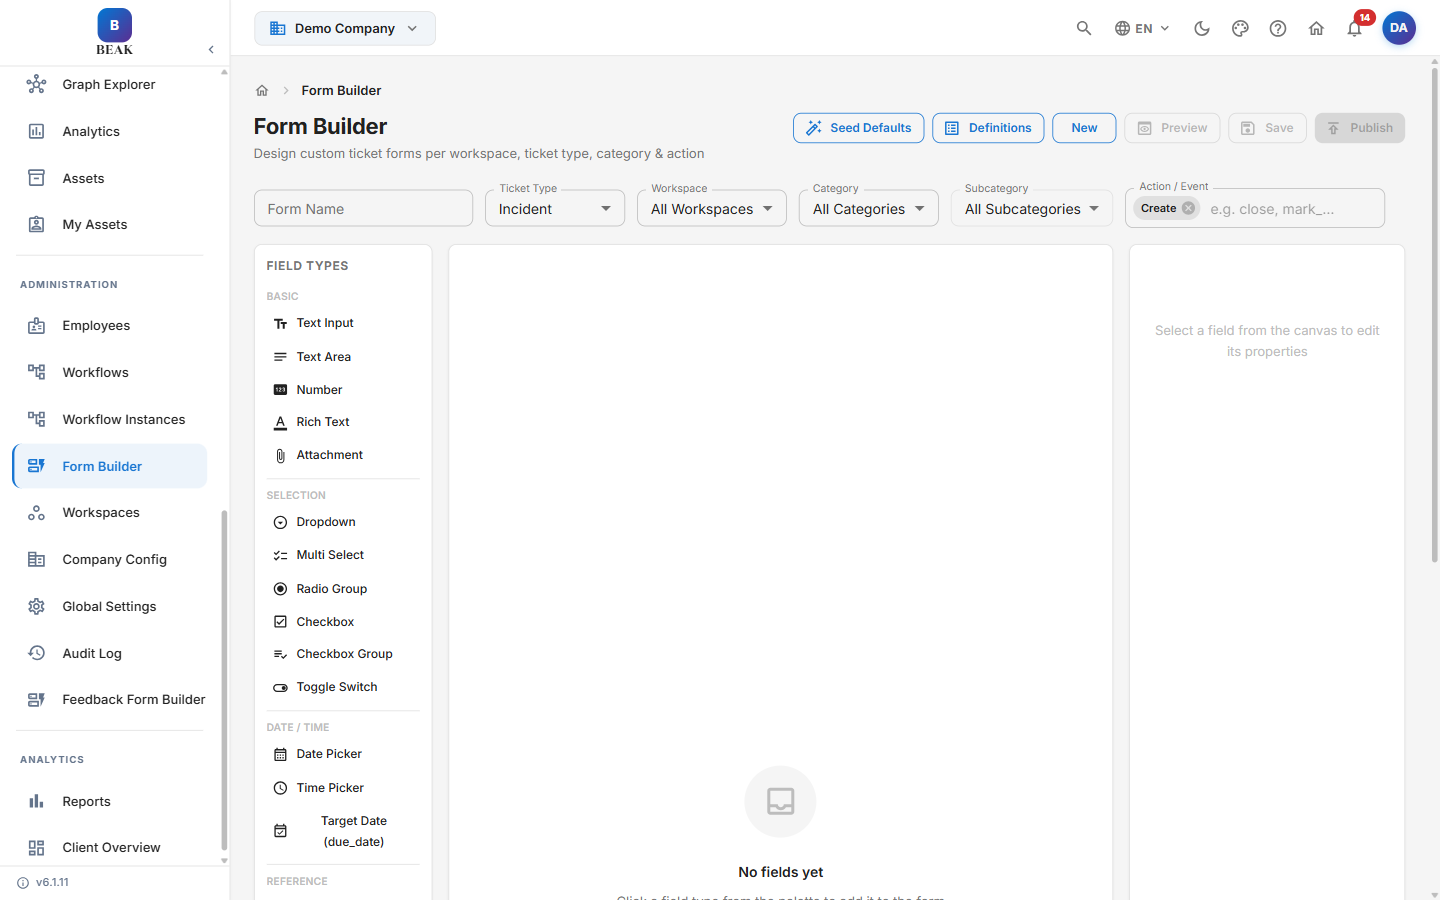
Form Configuration
Each form definition is scoped by a combination of the following attributes:
- Form Name — A descriptive identifier for the form definition.
- Ticket Type — The record type this form applies to, such as
Incident. - Workspace — The workspace in which this form is presented to users. Defaults to
All Workspaces. - Category — The ticket category that activates this form, enabling category-specific field sets. Defaults to
All Categories. - Subcategory — The ticket subcategory that further narrows when the form applies. Defaults to
All Subcategories. - Action / Event — The context in which the form is rendered.
When a user interacts with a ticket, BEAK ITSM resolves the most specific matching form definition based on these scoping attributes and renders it accordingly.
The top of the Form Builder provides the following actions:
- Seed Defaults — Loads the built-in default form definitions.
- Definitions — Opens the list of all saved form definitions.
- New — Starts a new form from scratch.
- Preview — Renders the form as end users will see it.
- Save — Saves the current form definition.
- Publish — Makes the form live.
Field Types
The drag-and-drop field-type palette is organized into the following groups:
Basic
- Text Input — Single-line free text entry.
- Text Area — Multi-line free text entry for longer descriptions.
- Number — Numeric input.
- Rich Text — Formatted text entry.
- Attachment — File upload field allowing users to attach supporting documents directly on the form.
Selection
- Dropdown — Single-value selection from a predefined list.
- Multi Select — Multiple-value selection from a predefined list.
- Radio Group — Mutually exclusive option selection displayed as radio buttons.
- Checkbox — Boolean true/false field.
- Toggle Switch — Boolean true/false field rendered as a toggle.
Date / Time
- Date Picker — Calendar-based date selection.
- Time Picker — Clock-based time selection.
- Target Date — Due-date field (
due_date).
Reference
- User Picker — Searchable lookup that resolves to a user record.
- Employee Picker — Lookup that resolves to an employee record.
- Email Picker — Lookup for selecting an email address.
- Workspace Picker — Lookup that resolves to a workspace.
- Category Picker — Lookup that resolves to a category.
- Subcategory Picker — Lookup that resolves to a subcategory.
- CI Picker — Lookup that resolves to a configuration item.
- Asset Picker — Lookup that resolves to an asset.
- Priority Picker — Lookup for selecting a priority value.
- Severity Picker — Lookup for selecting a severity value.
- Dynamic API Select — Selection populated from a configured API source.
Layout
- Section Divider — Visually groups fields into sections on the form.
Building a Form
- Navigate to Form Builder from the left sidebar and click New to open the form designer.
- Set the form's Form Name, Ticket Type, Workspace, Category, Subcategory, and Action / Event in the configuration panel.
- Add fields from the field-type palette on the left panel to the canvas. Click a field type to add it, or drag it onto the canvas. An empty canvas shows No fields yet.
- Select any field on the canvas to open its properties in the right panel, where you can configure its label, placeholder text, validation rules, and required or optional status.
- Reorder fields by dragging them within the canvas.
- Click Save to preserve your work, or Publish to make the form live.
Note: Published forms take effect immediately. Users creating or editing tickets that match the form's scope will see the updated form on their next interaction.
Managing Form Definitions
- Click Definitions at the top of the Form Builder to view all saved form definitions.
- Click New to start building a new form from scratch.
- Use the Preview button to render the form as end users will see it before publishing.
- Click Save at any stage to preserve the form definition, then Publish when ready.
- Existing published forms can be edited at any time; changes take effect on publish.
Default Forms
Click Seed Defaults at the top of the Form Builder to load the built-in default form definitions. These can be used as-is or customized as starting points for your own forms.