Client Integration Guide – Beak AI Agent Connectors
Overview
This guide provides an implementation framework for integrating enterprise systems with Beak AI Agents.
These integrations enable:
- Automation of repetitive IT and service desk tasks
- Self-service capabilities for end-users (password resets, FAQs, license requests)
- Cost optimization and insights through cloud and BI data
- Enhanced collaboration via Microsoft 365 and Teams integrations
The goal is to improve efficiency, reduce manual overhead, and empower users with AI-enabled IT operations and service desk support.
Required Access Summary
| System | AI Agents Involved | Required Access / Permissions |
|---|---|---|
| Azure AD / Entra ID | ITOps, ServiceDesk | Graph API: Directory.ReadWrite.All, User.ReadWrite.All, Policy.ReadWrite.AuthenticationMethod |
| AWS | ITOps, ServiceDesk | IAM Role: ReadOnlyAccess, Billing, CloudWatchReadOnlyAccess |
| Microsoft 365 (M365) | ITOps, ServiceDesk | Graph API: Directory.ReadWrite.All, Mail.ReadWrite, MailboxSettings.ReadWrite, TeamsAppInstallation.ReadWrite |
| Jira Service Management (JSM) | ITOps, ServiceDesk | API token or OAuth with ticket read/write + webhook subscription |
| Confluence | ServiceDesk | REST API token + service account (read-only on spaces) |
| SharePoint | ServiceDesk | Graph API: Sites.Read.All, Files.Read.All + service account access |
| Oracle BI | ServiceDesk | API credentials (BI Publisher) + Report Viewer role |
| Active Directory (On-Prem) | ITOps | Service account with directory write privileges (LDAPS enabled) |
Integration Details
Each system is detailed in its own section, including purpose, required access, implementation steps, workflow enablement, and testing.
1. Azure AD / Entra ID
Purpose: Centralized identity & access management (IAM).
Implementation Steps
Preparation
- Identify scope of integration: onboarding/offboarding, password resets, group management, MFA policies
- Confirm tenant admin access for Azure AD
Access Setup
- Sign in to the Azure Portal
- Navigate to Microsoft Entra ID → App registrations
- Click + New registration
- Fill in the details:
- Name: Service Desk Agent
- Supported account types: Select preferred option (usually Accounts in this organizational directory only)
- In the App Registration, go to Certificates & secrets
- Under Client secrets, click + New client secret
- Enter a description: Service Desk Agent Secret
- Choose an expiry (recommendation: 12 months or longer if allowed)
- Click Add
- Copy the Value immediately (it will not be visible again)
- Generate Client ID, Tenant ID, and Client Secret
- Assign required Microsoft Graph API permissions:
Directory.ReadWrite.AllUser.ReadWrite.AllPolicy.ReadWrite.AuthenticationMethod- Additional permissions depending on scope
Provide to us:
- Client ID (from App Registration)
- Tenant ID
- Client Secret
- List of API permissions granted (e.g.,
Directory.ReadWrite.All,User.ReadWrite.All,Group.ReadWrite.All) - Any restrictions (e.g., specific OUs or groups)
2. AWS
Purpose: Cloud infrastructure & FinOps optimization.
Implementation Steps
Preparation
- Define target AWS accounts (single or multi-account)
- Confirm access to AWS Organizations + Cost Explorer
Access Setup
- In AWS IAM, create a dedicated role for the AI Agent
- Attach policies:
ReadOnlyAccessBilling(for Cost Explorer)CloudWatchReadOnlyAccess
- Configure trusted entity policy to allow AI Agent to assume the role
Provide to us:
- Role ARN created for AI Agent integration
- External ID
- Policies attached to the role (minimum:
ReadOnlyAccess,Billing,CloudWatchReadOnlyAccess) - AWS account(s) and region(s) in scope
3. Microsoft 365 (M365)
Purpose: Productivity & collaboration automation.
Implementation Steps
Preparation
- Confirm global admin access to M365 tenant
- Identify required automation: license management, mailbox delegation, Teams notifications
Access Setup
- Sign in to the Azure Portal
- Navigate to Microsoft Entra ID → App registrations
- Click + New registration
- Fill in the details:
- Name: Service Desk Agent
- Supported account types: Usually Accounts in this organizational directory only
- In the App Registration, go to Certificates & secrets
- Under Client secrets, click + New client secret
- Enter a description: Service Desk Agent Secret
- Choose expiry (recommendation: 12 months or longer if allowed)
- Click Add
- Copy the Value immediately (it will not be visible again)
- Generate Client ID, Tenant ID, and Client Secret
- Assign Microsoft Graph API permissions:
Directory.ReadWrite.AllMail.ReadWriteMailboxSettings.ReadWriteTeamsAppInstallation.ReadWrite
Provide to us:
- Client ID, Tenant ID, Client Secret (from Azure AD App Registration)
- Graph API permissions granted (e.g.,
Mail.ReadWrite,MailboxSettings.ReadWrite,Directory.ReadWrite.All) - List of workloads included (Exchange, Teams, SharePoint, etc.)
4. Jira Service Management (JSM)
Purpose: Core ITSM ticketing system.
Implementation Steps
Preparation
- Confirm access to JSM instance (cloud/server)
- Identify workflows: ticket triage, SLA routing, KB ingestion
Access Setup
-
Create a Service Account
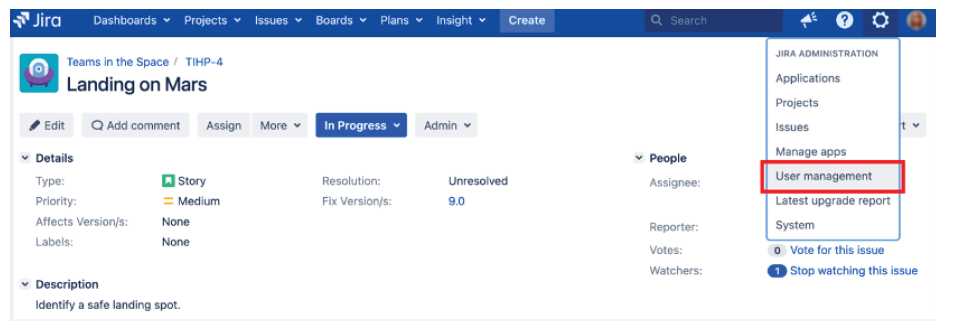
- Log in to Jira Service Manager (JSM) as an administrator
- Navigate to Administration → User Management → Users
- Create a dedicated service account (e.g.,
beaksvc@yourdomain.com) - Assign the service account to:
- Project Administrator (if required)
- Service Desk Team (minimum)
-
Generate an API Token
- Log in as the service account → Atlassian Account Settings → Security → API Tokens
- Direct link: https://id.atlassian.com/manage-profile/security/api-tokens
- Click Create API Token
- Enter label: Service Desk Agent Integration
- Copy and securely store the token
-
Configure Jira Service Management Project Permissions
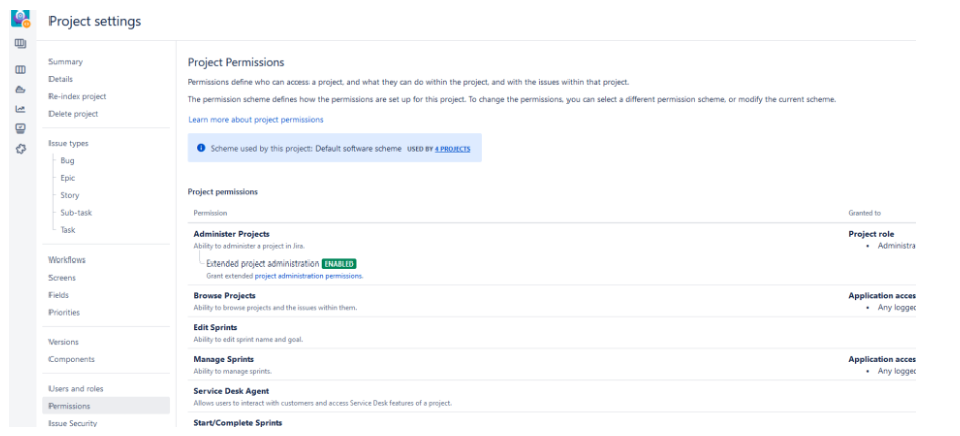
- Open your Jira Service Management (JSM) project.
- In the left sidebar, click Project settings.
- Scroll and click Permissions.
- Find and add your agent’s identity (App) (e.g.,
beaksvc) to the following permissions:
Permission Why It’s Needed Create Issues To allow the agent to create new tickets. Edit Issues To allow updates to ticket fields and comments. Delete Issues To allow deletion of tickets (if needed). Transition Issues To change ticket status (e.g., Open → In Progress → Resolved). Assign Issues To assign tickets to agents. - For each of the above permissions, click Add next to the permission.
- In the dialog, grant permissions to the App user (name depends on how the user is configured), e.g.,
beakai. - Click Grant.
- Repeat the same for all of the above accesses.
- After adding all permissions, save your changes.
- Verify Permissions
- Log into Jira Service Manager using the created service account.
- Try performing the following actions on a test ticket:
- Create issues
- Edit issues
- Delete issues
- Transition issues (e.g., move ticket from Open → In Progress → Resolved)
- Assign issues to users
Provide to us:
- API token (Atlassian Cloud) or OAuth credentials (Server/DC)
- Username/email tied to the API token
- Jira project IDs that should be in scope
- Required permission scope (read/write)
5. Confluence
Purpose: Knowledge management platform.
Implementation Steps
Preparation
- Identify spaces containing SOPs and policies
- Confirm Confluence admin access
Access Setup
- Create a service account in Confluence
- Generate an API token for this account
- Assign read-only permissions to selected spaces
Provide to us:
- Service account username + API token
- List of spaces that should be accessible
- Confirm whether read-only or edit permissions are required
6. SharePoint
Purpose: Enterprise document storage & knowledge base.
Implementation Steps
Preparation
- Identify SharePoint sites and libraries
- Confirm admin access
Access Setup
- Sign in to the Azure Portal
- Navigate to Microsoft Entra ID → App registrations
- Click + New registration
- Fill in details:
- Name: Service Desk Agent
- Supported account types: Usually Accounts in this organizational directory only
- In the App Registration, go to Certificates & secrets
- Under Client secrets, click + New client secret
- Enter description: Service Desk Agent Secret
- Choose expiry (recommendation: 12 months or longer if allowed)
- Click Add
- Copy the Value immediately (it will not be visible again)
- Generate Client ID, Tenant ID, and Client Secret
- Assign Graph API permissions:
Sites.Read.AllFiles.Read.All
- Grant service account read-only access to target sites
Provide to us:
- Client ID, Tenant ID, Client Secret
- Graph API permissions granted (minimum:
Sites.Read.All,Files.Read.All) - URLs of SharePoint sites/libraries to include
7. Oracle BI
Purpose: Business Intelligence & reporting.
Implementation Steps
Preparation
- Identify BI reports for ingestion
- Confirm admin access
Access Setup
- Create a service account in Oracle BI
- Assign Report Viewer role
- Generate API credentials for BI Publisher
Provide to us:
- Service account username + password
- API endpoint URL
- List of reports/dashboards to ingest
- Confirm role assigned (minimum: Report Viewer)
8. Active Directory (On-Prem)
Purpose: Legacy IAM for password reset and group management.
Implementation Steps
Preparation
- Confirm access to on-prem domain controllers
- Define OU structure for integration
Access Setup
- Create a service account with reset/group write permissions
Provide to us:
- Service account username + password
- Domain controller details (hostname/IP)
- Confirm permissions granted (password reset, group write access)
- OU structure in scope (optional)
9. Azure (Cloud Platform)
Purpose: Infrastructure hosting & monitoring.
Implementation Steps
Preparation
- Identify resource groups and subscriptions
- Confirm Azure subscription owner access
Access Setup
- Sign in to the Azure Portal
- Navigate to Microsoft Entra ID → App registrations
- Click + New registration
- Fill in details:
- Name: Service Desk Agent
- Supported account types: Usually Accounts in this organizational directory only
- In the App Registration, go to Certificates & secrets
- Under Client secrets, click + New client secret
- Enter description: Service Desk Agent Secret
- Choose expiry (recommendation: 12 months or longer if allowed)
- Click Add
- Copy the Value immediately (it will not be visible again)
- Generate Client ID, Tenant ID, and Client Secret
- Assign RBAC roles:
- Contributor (for provisioning)
- Monitor Reader (for alerts)
Provide to us:
- Client ID, Tenant ID, Client Secret
- Subscriptions/resource groups included
- RBAC roles assigned (e.g., Contributor, Monitor Reader)